ESP8266 NodeMCU Async Web Server Control Outputs Random Nerd Tutorials

Getting started with NodeMCU Engineering Education (EngEd) Program Section
From the Wemos D1 mini to the NodeMCU, the ESP8266 based boards are by far the most popular platform, among makers and hobbyist, for building WiFi based projects due to their low cost and general ease of use.

Getting Started With ESP8266(LiLon NodeMCU V3) Complete Guide for IoT Startup With Example(as
Create Simple ESP8266 NodeMCU Web server in Arduino IDE This guide teaches you how to create a simple ESP8266 NodeMCU web server in Arduino IDE. You will learn to control GPIO pins of ESP8266 NodeMCU from a basic Web server. You also get to know about creating password protected web server with ESP8266 based NodeMCU board.

Módulo esp826612E v3 NodeMcu ESP12E wifi Microwat
1. Install ESP8266 Board in Arduino IDE We'll program the ESP8266 using Arduino IDE, so you must have the ESP8266 add-on installed. Follow the next tutorial to install it: Install ESP8266 Board in Arduino IDE (Windows, Mac OS X, Linux) 2. Filesystem Uploader Plugin

ESP8266 ClientServer WiFi Communication Between Two Boards (NodeMCU) Random Nerd Tutorials
Looking For Module Nodemcu Esp8266? We Have Almost Everything On eBay. Fast and Free Shipping On Many Items You Love On eBay.
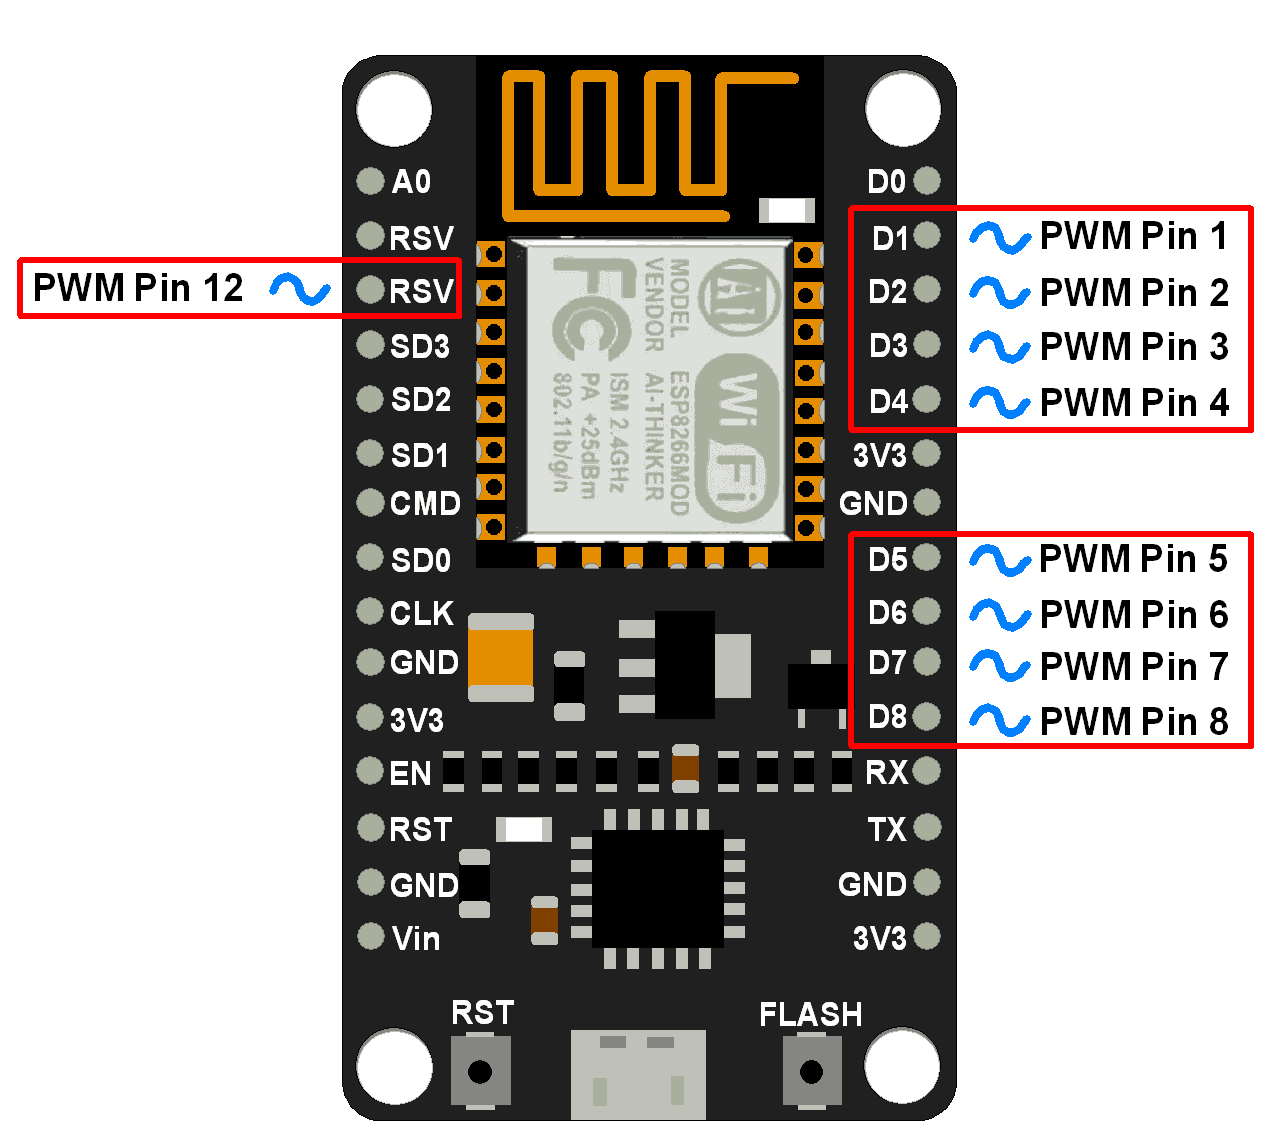
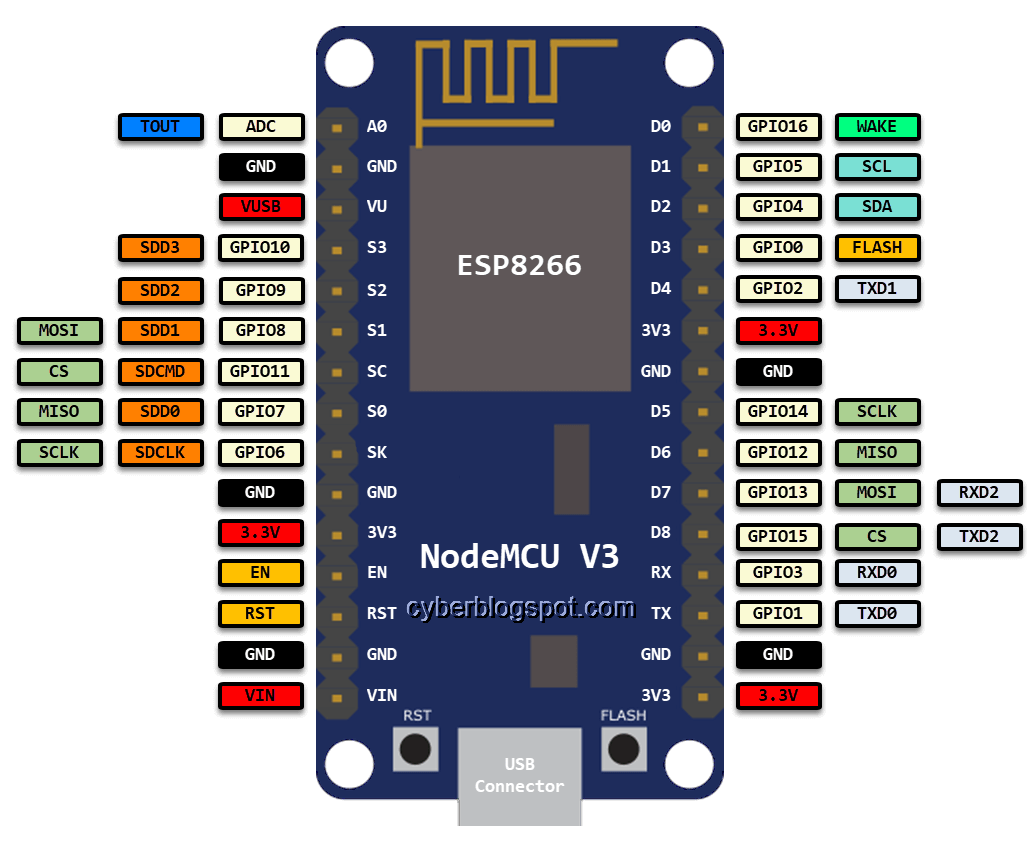
Nodemcu ESP8266 Pinout, Features, and specifications
Create A Simple ESP8266 NodeMCU Web Server In Arduino IDE In recent years, the ESP8266 has risen to prominence in IoT and WiFi-related projects. It's a low-cost WiFi module that, with a little extra effort, can be programmed to run a standalone web server. What a cool thing! What exactly is a Web server and how does it work?

Nodemcu ESP8266 Pinout, Features, and specifications
ESP8266 NodeMCU Access Point (AP) for Web Server In this tutorial, you'll learn how to set your ESP8266 NodeMCU as an Access Point (AP) using Arduino IDE. This allows you to connect directly to your ESP8266 via Wi-Fi without a wireless router. To set the ESP8266 as an Access Point use WiFi.softAP (ssid, password); ESP8266 Station and Access Point
Introduction To Nodemcu (esp8266) Vrogue
February 12, 2021 By Ravi Teja In this tutorial, I will show How to Build a Simple ESP8266 Web Server. This ESP8266 NodeMCU standalone Web Server can be accessed by any device in the local network that has a web browser (Mobiles, Laptops, Tablets).
Esp8266 nodemcu datasheet
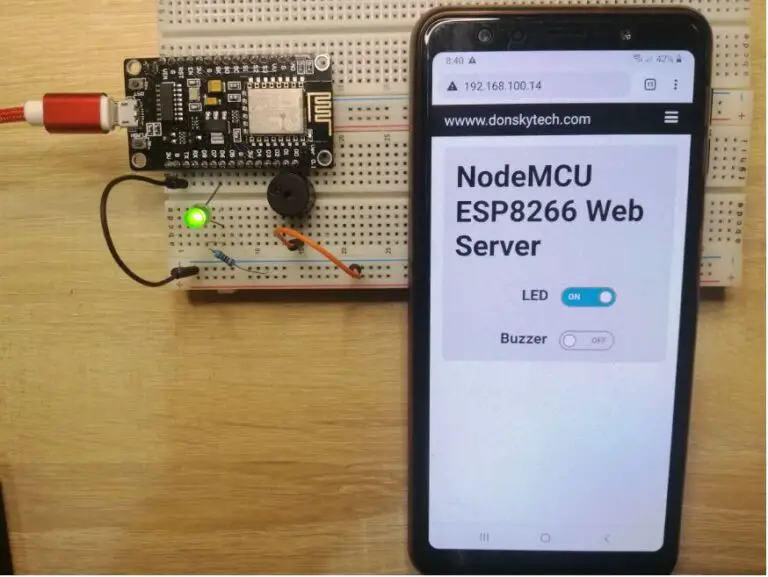
First, the user will click the Toggle button. The web server will send the "toggle" request message through the WebSocket communication protocol. Our ESP8266 NodeMCU board will receive the "toggle" request and it performs the particular action. The on-board LED will turn on if it was previously off and vice versa.
NodeMCU ESP8266 Web Server Tutorial Series
ESP8266 Client-Server Wi-Fi Communication Between Two Boards (NodeMCU) Learn how to establish a Wi-Fi communication (HTTP) between two ESP8266 NodeMCU boards to exchange data without the need to connect to the internet (you don't need a router). You're going to set one ESP8266 as an Access Point (Server) and another ESP8266 as a Station (Client).
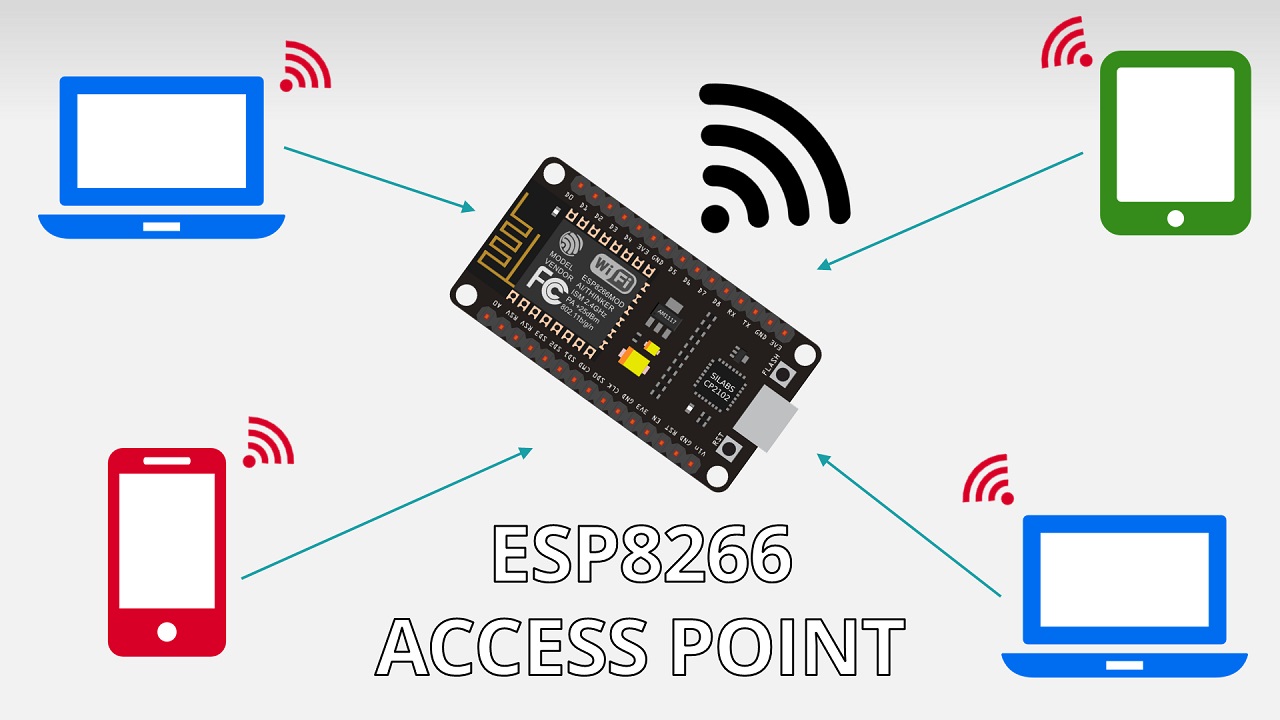
ESP8266 NodeMCU Access Point (AP) for Web Server Random Nerd Tutorials
As in the case with SSE, only the ESP8266 NodeMCU server will be able to send events to the webpage. The web page gets updated accordingly and the process continues. DS18B20 Introduction. DS18B20 is a temperature sensor that is single wire programmable in nature. It is widely used to measure the temperature of chemical solutions and substances.

ESP8266 Web Server using SPIFFS with Arduino IDE (NodeMCU) Random Nerd Tutorials
ESP8266 NodeMCU WebSocket Server: Control Outputs (Arduino IDE) In this tutorial you'll learn how to build a web server with the ESP8266 using WebSocket communication protocol. As an example, we'll show you how to build a web page to control the ESP8266 outputs remotely.
Nodemcu ESP8266 Pinout, Features, and specifications
Start by placing the NodeMCU board on a breadboard, ensuring that each side of the board is on a separate side of the breadboard. Then, connect two LEDs to the digital GPIO pins D6 and D7, utilizing a 220Ω current-limiting resistor. Once completed, your setup should resemble the image provided. Add Tip Ask Question Comment Download
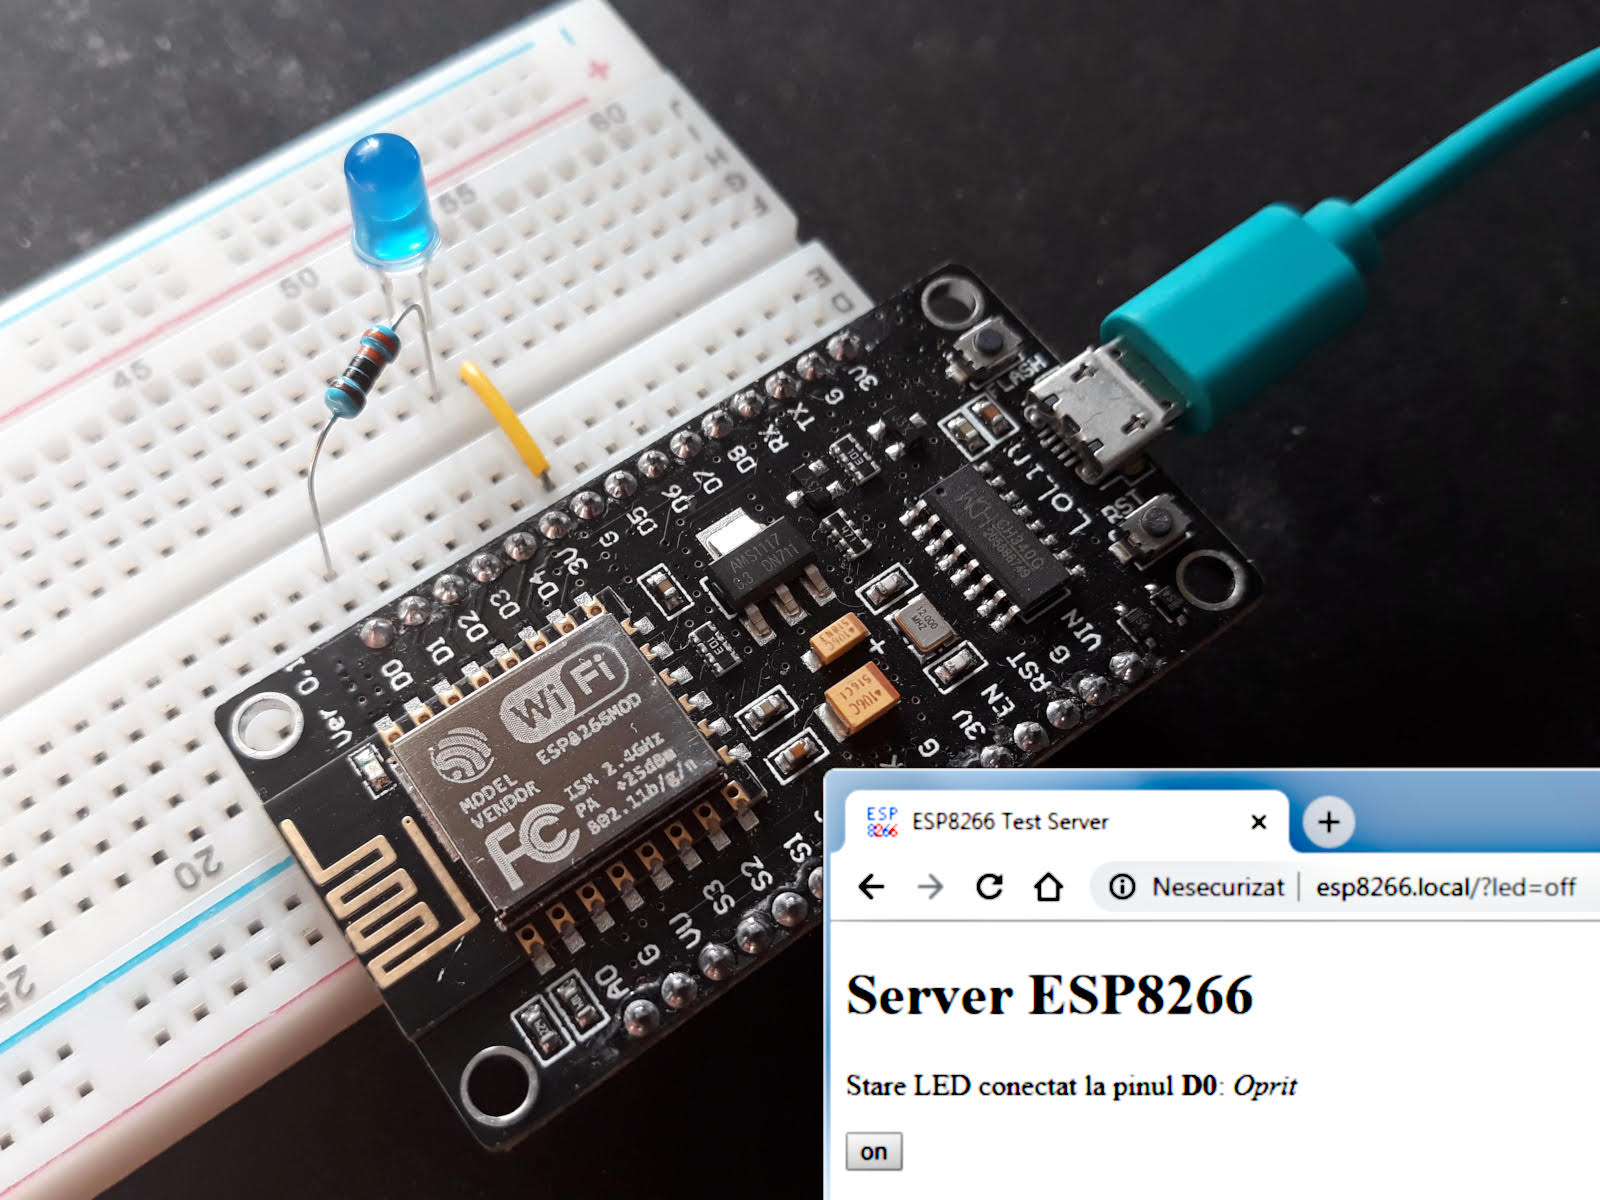
Server web simplu pe NodeMCU ESP8266 · One Transistor [RO]
This tutorial shows you step-by-step how to build a standalone ESP8266 web server that manages two outputs (two LEDs). Any device with a browser on your local
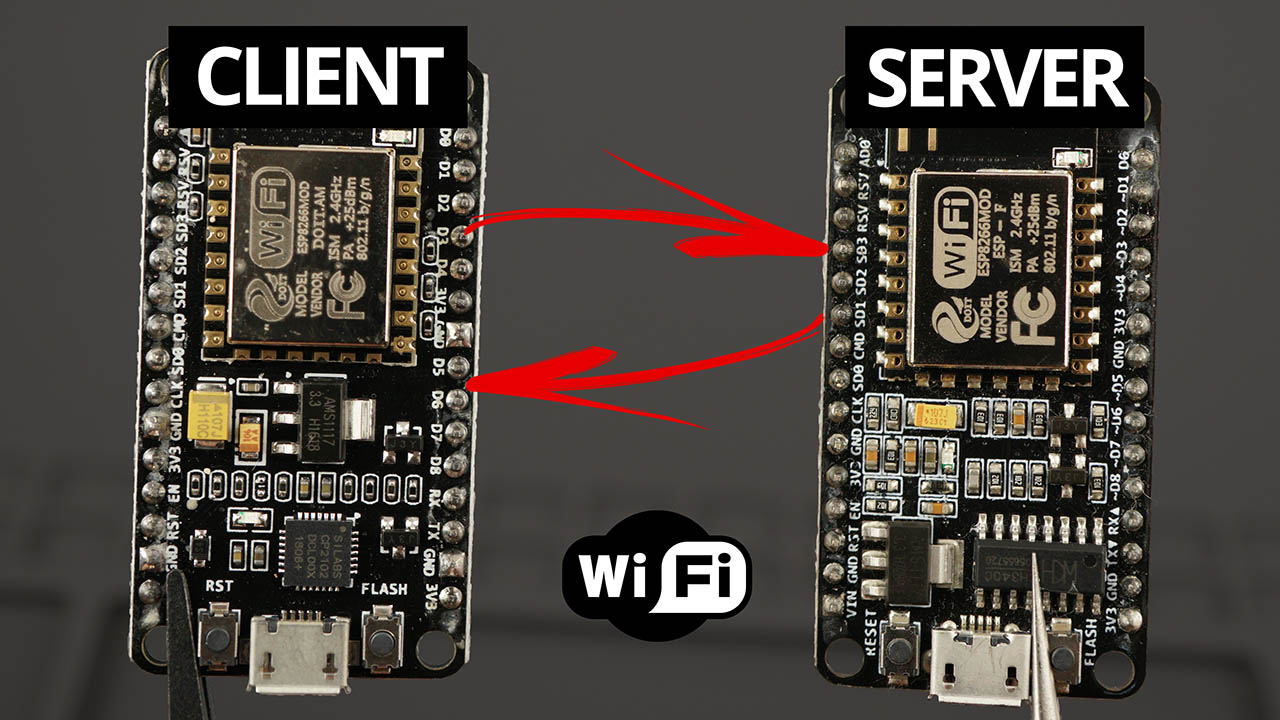
ESP8266 ClientServer WiFi Communication Between Two Boards (NodeMCU) Random Nerd Tutorials
This tutorial shows how to create a web server that serves HTML and CSS files stored on the ESP8266 NodeMCU filesystem (SPIFFS) using the Arduino IDE. We'll
NodeMCU Getting started with ESP8266
ESP8266 NodeMCU consists of a web server and will act as a web browser client. We will create a web server with the help of espsinkwebserver library that updates the web page without refreshing it. We will create HTML and CSS files and store them in ESP8266 NodeMCU's LittleFS. Whenever the user will make a request by entering the IP address.

Esp8266 nodemcu datasheet
Testing. Upload above code and open serial monitor first to get the IP address of ESP8266. Then Open Telnet program to test the communication. Step 1: Get IP from serial monitor and Connect to ESP using telnet [192.168.xx.xx IP] [port] Step 2: Observe serial monitor. Step 3: Send Some data from telnet.
