Pin on Gnome Cookies and Treats

Timeline Photos Melissa Joy Fanciful Cookies & More Facebook Elf
Easy Christmas Gnome Cookies. Super cute and simple, made with store bought cookie dough, topped with a homemade buttercream "beard", strawberry hat and candy nose. Preheat oven to 350°F. Spray a mini muffin pan with non-stick cooking spray. place cookie dough balls in mini muffin pan to make 24 cookie cups. Bake for 20 minutes or until light.

Gnome Garden Cookies Cookie Cutter Kingdom
Make a batch of 2-Ingredient Peanut Butter Cup Cookies. Let cool. Find the 12 best looking strawberries in the container and cut the stems out, making the smallest hole possible. Set aside. Place desired amount of icing in a piping bag. (Or you could use a sandwich bag with a small corner cut off.) Pipe the frosting over the top of the cookie.
Gnome Cookies Garden Party Idea Inspired By Gnomeo and Juliet
Cookie Cups. Preheat oven to 350°F and spray a mini muffin pan with cooking oil spray. You can also use mini cupcake liners if you have them (preferred method). Place one cookie piece into each muffin cup. You don't need to flatten or roll them. Bake cookies for 20 minutes and place pan on a wire rack to cool.

My gnome cookies Gingerbread cookies, Gingerbread, Cookies
Preheat the oven to 350 degrees F. Grease a mini muffin pan and set aside. Roll sugar cookie dough into 1 inch balls and place in each mini muffin cup. Bake for 12-15 minutes until lightly golden brown. Remove cookie cups from muffin tin and let cool on a cooling rack. Once cool use the decorative icing and squeeze to one side of the cookie cup.

How to Make a Set of Adorable Gnome Cookies Spring cookies, Cookie
Recipe to make these Gnome Cookies. Start by preheating your oven to 350 degrees. Take your oil and sugar and mix with your mixer, then add in aquafaba and vanilla extract. Mix together well and set aside. Grab your flour and baking powder and whisk the two together in a totally separate bowl.

Gnome Cookies 1 Dozen Specify Colors Etsy Fall decorated cookies
Directions. In a large bowl, cream butter, confectioners' sugar and extracts until light and fluffy, 5-7 minutes. Beat in the egg. Combine the flour, baking soda and cream of tartar; gradually add to creamed mixture and mix well. Divide dough into thirds. Shape each into a ball, then flatten into a disk. Place in a covered freezer container and.

Gnome cookies... wow! Sugar Cookies, Cookies Et Biscuits, Gnome Cookie
Turn the cookie dough out onto a sheet of parchment paper. Don't bother to dust the parchment paper with flour, as the cookie dough won't stick to it. Roll out the cookie dough to 1/4-inch thick. With your Christmas gnome cookie cutter shape, cut out your cookies. Remove all of the excess dough from around each of the cookies.

fun gnomes and woodlandesque Cookie decorating, Sugar cookie, Sugar
easy decorated gnome sugar cookies. DECORATE THOSE COOKIES! Step 1. Bake your favorite sugar cookies, cut with ice cream cookie cutter into shapes, and let cool completely. (We added hilarious Nanette and simply cut a round cookie with a cup then added two circles for "eyes" to shape a frog.) Step 2. Make an XL batch of royal icing frosting.

Gnome Cookies Ever After in the Woods
Believe me, I remember order of operations being overwhelming in the beginning. But after more practice, you'll be able to look at a cookie and dissect how they were made. 1. Pipe pleat lines and let dry. 2. Outline and fill up to and around pleat lines. Let crust. 3. Pipe and fill beard.

Pin on Gnome Cookies and Treats
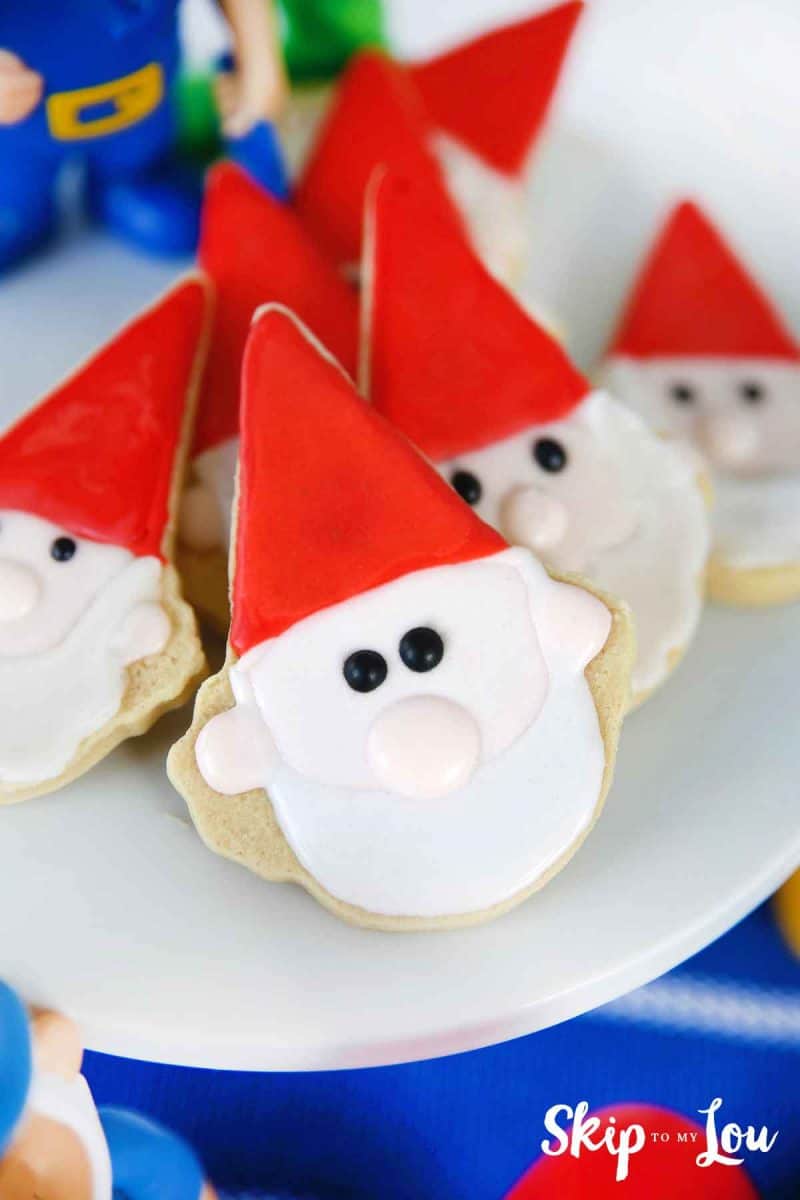
Cookie Cutters: Christmas Gnome Cookie Cutter from Truly Mad Plastics- I love this cookie cutter. You can also use a Santa face cookie cutter if you trim off the bottom of the beard. Royal Icing Colors: Beachy Blue Gel Icing Color- The Cookie Countess- Gnome clothes; White- Beard; Green- The Cookie Countess Gourmet Green- Rose leaves

How to Make Valentine Gnome Cookies Valentine sugar cookies, Royal
Gnome Cookies. We go together like Milk & Cookies. 24000. Cookies. 18300. Sweet Rolls. 17000. Brownies. Our Core Values. Integrity. Our first goal is taking care of our team members and our products. Never do we overlook the importance of ethics or integrity. We speak the truth in a straightforward and transparent manner. We are stewards of the.

Gnome sugar cookies Iced Cookies, No Bake Cookies, Sugar Cookies, Gnome
Instructions. Preheat oven to 350°F and spray a mini muffin pan with cooking oil spray. You can also use mini cupcake liners if you have them. Place one cookie into each muffin cup. You don't need to flatten or roll them. Bake cookies for 20 minutes and place pan on a wire rack to cool.

Pin on Laura
The mint flavor of these cookies really shines through with a perfectly balanced royal icing flavor. CUTTER & DESIGN. For these mischievous St. Patrick's Day gnome cookies, I used THIS cutter. The cutter is perfectly sized for decorated cookies and I love that it is a full-body gnome design.

CosmoCookie Gnome Cookies
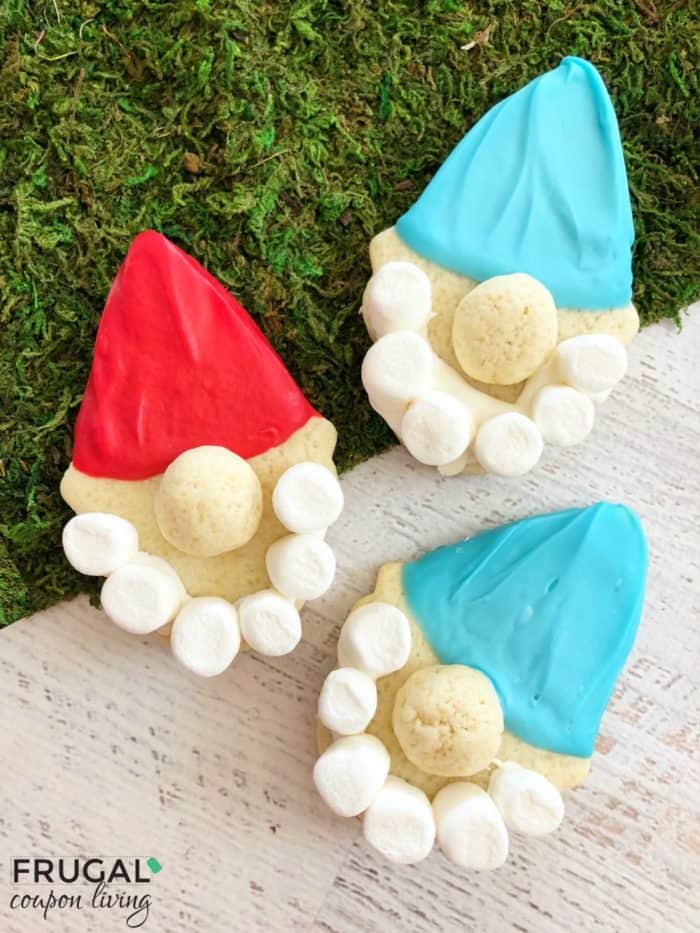
How to Make Christmas Gnome Cookies in the Oven. Step 1: Preheat the oven to 350°F. Then, spray a 24-tin mini muffin pan with non-stick cooking spray and set aside. Step 2: Break the Ready-to-Bake Sugar Cookie squares apart and place them in the bottom of each muffin tin. Step 3: Bake the cookies for 15-20 minutes or until golden brown. Step 4: Once they're done baking, remove them from the.

CosmoCookie Gnome Cookies
Preheat oven to 350. Line baking sheets with silicon mats and set aside. In a large bowl of an electric mixer fitted with the paddle attachment, cream butter and sugar until light and fluffy. Add in egg and extracts, scrape down sides. Next, add the cream of tartar, baking soda, and flour into the mixture and combine well.
Gnome Cookies Skip To My Lou
How to make Chocolate Gnome Cookies: Step 1. Cream the butter and sugar together. Use a large standing mixer with a paddle attachment. Combine butter and sugar on medium speed until creamy, scraping down the sides of the bowl occasionally. Then add the remaining wet ingredients - eggs and vanilla - and mix again. Step 2.
